I ran into this directly after class. I thought it was interesting that the person associated this with the idea of nowhere.
Nowhere
Thursday, May 5, 2011
Wednesday, May 4, 2011
Photographer's Dilemma - "The Bang Bang Club"
Most interesting article.
Having done a year in the Vietnam war I was often torn.. to "photograph" or to help... sometimes images help influence a situation in a positive way and in the "big picture" may be more helpful then our jumping in to aid and individual... This movie depicts Kevin Kitsch in Sudan during the 1993 famine.. ho took the Pulitzer Prize shot of a vulture perched behind a starving child.... the world exposed him to harsh criticism that may have contributed to his suicide. The Bang Bang Club is currently in limited release on-demand from cable.
URL for the Wall Street Article...
http://online.wsj.com/article/SB10001424052748704436004576298953370956940.html
How do we decide?
BTW- Author (Mr. Woodward) is an Arts Critic in NY
Sunday, May 1, 2011
Quality Art Scam.. Be careful
I went over to Quality Art (200E 52nd St) to get some mat board.. in looking around I found a mat cutter which the manger told me he would give me 40% off... I've wanted to get one so I bit.
When I got home I decided to check other stores prices & I had been had. They had inflated the list price so they were getting a great profit... soooooo I paid $130 extra.. and for icing on the cake below the item on my receipt it states Sale is final & item not returnable... The receipt was put in a bag at the store before I ever had a chance to see it... Be careful out there.. It's been a long time since I've taken a hit like this.. lesson learned check prices on the internet first esp. on big ticket items.
Thursday, April 28, 2011
Light Photography
This is becoming a concentration of mine in the fine art of photography and I've found an artist and some images that y'all might enjoy. The essence is using objects to create light as design, to create a space, fill that space, and use the dimensions of light to create aesthetic value. Enjoy!
Alan Jaras
http://www.neublack.com/art-design/alan-jaras-light-photography/
Light Art Performance Photography
http://www.flylyf.com/lapp-light-art-performance-photography/
Alan Jaras
http://www.neublack.com/art-design/alan-jaras-light-photography/
Light Art Performance Photography
http://www.flylyf.com/lapp-light-art-performance-photography/
Sunday, April 24, 2011

Saturday, April 23, 2011
data transfer...
I'm using 32GB Cf cards for my photos.. so when they are full It has been difficult to put a system for transfer, that will work while I'm on the road... Sooooo I bought a net book for $300 (about the cost of several data transfer devices ).. So now I can 1st down-load to my net book... then I can transfer to a portable mini hard drive.. then I feel safe to erase the data from my CF card... this way I have two copies of each photo, should one crash.. I'm covered...
Be Well ! Jim
Tuesday, April 19, 2011

Wednesday, April 13, 2011
150 Years of Photography, Life's 1988 Anniversary Issue
I have the Life magazine's - 150 Years of Photography - it's their 1988 Anniversary Issue!.. I'll bring it to class this thursday... :)
Tuesday, April 12, 2011
Hanna
So, I have 2 classes with Jon, meaning I have 2 blogs to keep up with. I'm cross-posting this, as it's just that good.
Yes, yes, I know this is a photography class, but you must see this movie. The cinematography, & editing alone are of an aesthetic I don't often see, particularly in more mainstream movies. This aesthetic captured my attention from the minute the movie started. For lack of a better word at the moment, it was beautiful. The score is a plus too & fits perfectly with the film in every way. Everything was very cohesive.
LINK
Sunday, April 10, 2011

Thursday, April 7, 2011

Mauricio Lasansky - From "Expressions"
The following is an excerpt from "Expressions", a book written by Lasansky. For those who don't know who he is, there is more information on that website about him and his work. He is one of the most notable and inventive artists of the last century and his work has been displayed most anywhere that art is able to be displayed.
I found this excerpt to be quite revealing and inspiring when it comes to thinking about your artistic process and the things that you observe as an artist. He describes a process of drawing constantly, always switching between works as you see fit, and defining your medium, whether that's using one already formed or creating your own for your message. Along with other insight, reading about his work and about him is fascinating.
http://www.lasanskyart.com/artist/news/articles/expressions_14_31-42.shtml
Tuesday, April 5, 2011
tilt-shift
I got to try-out our classes' tilt-shift lens that "straightens out buildings for great architectural images... super for that type of work.. here is an example of what I did... Give it a go! any questions please ask me..
http://www.flickr.com/photos/9505367@N06/5583370827/lightbox/
Have fun! Jim Price
Monday, April 4, 2011
Visiting Artist!!!
HARMONY HAMMOND
The Boise State University Art Department Visiting Artist and Scholar Program is proud to present a free public lecture byHarmony Hammond. In conjunction with the lecture, there will be a free public screening of The Heretics, the 2009 film by Joan Braderman which features Harmony Hammond, Pat Steir, Ida Applebroog and other founding members of the magazine “Heresies: A Feminist Publication on Art and Politics” (1977-92).
About the Events
Free Film Screening – The Heretics – Tuesday, April 5th, 2011 from 11:55am to 1:30pm in The Special Events Center, Student Union Building.
Free Public Lecture – Wednesday April 6th, 2011 at 6pm in the Lookout Room, Student Union Building (Free parking available in the Liberal Arts parking lot (between LA and SPEC).
About the Artist
Harmony Hammond is an artist, art writer and independent curator who lives and works in Galisteo, New Mexico. Considered a pioneer of the feminist art movement, she lectures, writes and publishes extensively on feminist art, lesbian art, and the cultural representation of “difference”.
Hammond was a co-founder of A.I.R., the first women’s cooperative art gallery in New York, (1972), and co-editor of Heresies: A Feminist Publication on Art & Politics, (1976). She was a Professor at the University of Arizona (Tucson), from 1988-2005, and has recently been a Visiting Artist at: Skowhegan, Anderson Ranch, the Santa Fe Art Institute and the Vermont Studio Center.
Her work has been shown internationally in venues such as Site Santa Fe; New Museum, NYC; Smack Mellon Studios, Brooklyn; National Academy Museum, NYC; Bronx Museum; Museum of Contemporary Art, Los Angeles; Center for Contemporary Arts, Santa Fe; P.S. 1 Contemporary Art Center, Long Island City, Queens; Armand Hammer Museum, Los Angeles, Neue Galerie, Graz, Germany; Museum of Contemporary Arts, Havana; Museo Universitario del Chopo, Mexico City; and the Haags Gementemuseum, the Hague.
Her book Wrappings: Essays on Feminism, Art & the Martial Arts, (TSL Press, 1984), a classic on 70s feminist art, is out-of-print. Her ground-breaking book Lesbian Art in America: A Contemporary History (Rizzoli, 2000) received a Lambda Literary Award.
For more information contact carolineearley@boisestate.edu or go to http://www.harmonyhammond.com
Sunday, April 3, 2011
Using the Content Aware feature in Photoshop
Here's a small post detailing how to use the Content Aware feature in Photoshop CS5. This feature lets you edit out pixels in your photograph that you may consider blemishes. This may involve getting rid of scratches on a scanned negative, or removing a stain (cat) from a carpet. This feature has some limitations that will be made obvious when you being to use it, but it may prove to be benficial to you at some point. It works as a function of both the Healing Tool and selection tools like the Lasso. It DOES NOT work witht the Clone Tool like I had originally thought. Just an F.Y.I. When using the Healing Tool, you will actually have the option to make a "content aware" selection in tool box that comes up when you select the Healing Tool. Check the "content aware" selection, then click and drag your mouse over the spot you want removed. When using a selection tool: first make your selection, go to 'file', and then click the 'fill' option . A tool box should pop up with several 'fill' options. Choose 'content aware'. BOOM! Done! I've attached a link to a professional video just in case my crystal clear technical document left anyone confused. http://tv.adobe.com/watch/photoshop-cs5-feature-tour/contentaware-fill
Friday, April 1, 2011
Dodge & Burn in Photoshop
Dodging and Burning in Photoshop
Under normal non-extreme lighting conditions the modern camera of today will give a well-balanced exposure for highlight and shadows, in some circumstances fill flash will also improve exposure. Where flash is not practical, editing techniques in your photo editing software will enable you to fine-tune the exposure short falls in the highlight and shadow regions to produce a well-balanced image. Two of the most misunderstood tools found in most editing programs are the dodge and burn brushes. Too many people don’t use them at all, and too many people who do use them do so incorrectly. With any kind of luck this tutorial will provide a little insight into what these tools do, and how you can use them to make better images.
Simply put, the dodge tool lightens the pixels you paint, and the burn tool darkens the pixels you paint. An old analogy is when you burn a piece of toast you darken it so the burn tool is to darken. It’s not entirely different from using Levels or Curves. The difference is that you are not applying the changes to the entire image; you’re applying them only to the places you paint with the brushes. Think of it as a way of selectively adjusting the brightness or darkness of your image. Also no adjustment layers are created & you don’t need to mask them so this is easy. Dodge tool is excellent to brighten eyes & teeth.
You can use these tools to improve your images in several different ways:
- To improve the exposure of your photo and bring out detail
- To direct your viewers attention through creative use of highlights and shadows
- To create impact by adding dramatic highlights and shadows
|
As a rule of thumb, you will most often use the “highlights” setting for the dodge tool, and the “shadows” setting with the burn tool.
Exposure: In most applications, the key to effective dodging and burning is subtlety. If you create the effect you’re after without allowing the viewer to detect the changes, the image will have far more impact. For this reason, I suggest setting your exposure to only 3-5% and use repeated sweeping movements over the area you are trying to affect. It makes the changes far more gradual and harder to detect; it also requires a little patience. It’s slow, but it works. I promise. Put on some music or something to help pass the time. Protect the original picture & making another layer click on background, [control+alt+j], name the layer.
Monday, March 28, 2011
Thursday, March 24, 2011
Some Photographers
Martin Parr
Jeff Wall
Joel Sternfeld
Roni Horn
Collier Schorr
Sophie Calle
Nan Golden
Larry Sultan
Mike Mandel
Andreas Gursky
Thomas Struth
Thomas Demand
Wolfgang Tillmans
Gilbert & George
Shawn Records
Robert Heinecken
Melanie Schiff
Tuesday, March 22, 2011
Vintage Photo Effect
To create a vintage effect on a desired photo :
1. Photo filter adjustment layer: add yellow overlay.
Adjustment panel (right side of screen), click on the photo filter adjustment icon.
- Able to choose from a variety of different filters: choose yellow
- Change density to about 75%.
- Return to adjustment layer.
2. Add levels adjustment: want the image to look flatter and a little washed out.
- Click levels icon: drag mid-tone slider to somewhere between 1.5 and 1.6.
- Back to adjustment panel.
3. Add another adjustment layer: want to drain some of the color from the image.
- Click Hue\Saturation icon: drag saturation slider to left, anywhere between -20 and -40
4. In the layers panel: move photo filter adjustment layer to the top of the layers panel, this will keep the changes made to the mid-tones and hue\saturation layers from affecting the yellow filter.
We can make the photo look a little more vintage by adding some noise and a darkened edge effect to the image. This can be achieved by using smart filters.
1. Click on the photo layer: we are going to convert it for smart filters first.
- Move up to the filter menu: click ‘filter menu’: click ‘convert for smart filters’.
- A dialogue box will pop up, just click ‘ok’.
2.Add noise: Click the ‘filter menu’ again.
- Click noise: click ‘add noise’.
- In the dialogue box: set the noise amount to around 4% or 6% (this is subjective so choose the amount that looks good to you).
3. Add darkened edge: Click ‘filter menu’.
- Click lens correction: click ‘custom tab’.
- Drag vignette slider all the way to the left.
- Click ‘ok’.
The opacity can be adjusted by using the blending options. Suggested to soften opacity to 75%.
Sunday, March 20, 2011
Vignette in photoshop
· First you want to grab your correct style marquee.
· Next you want to drag a marquee and create the marching ants. You do want to make sure the marquee is slightly inside your image and set it where you want the vignette to begin in your photo or graphic.
· You then want to choose select on the toolbar at the top, then chose invert. This reverses the marquee.
· The second step is to right click on the marquee of the image and press feather. This brings another marquee onto the picture plane as curved shape.
· The last step is to go to Image, Adjustments, and Levels. Then take the slider toward the bottom all the way from white to black. Press enter, then command D for deselect.
· To do this for a graphic you follow the same steps, only you add a curve layer and that layer is the one you work from.
o Another way to do a vignette is to first pull up a photo, open the layers, go to curves, drag the blacks (at the bottom of the graph) over quite a ways, then drag the line down a bit (darkness doesn’t really matter. Then go to gradient and select it from dark to light, can do circular ellipse (shape of your choice), then you are just going to click in the middle of the area you want to have the “spotlight” on and drag it out. You can do it in the corner, middle, etc.
Friday, March 18, 2011


Thursday, March 17, 2011
Camera Manual on your pc
I almost always carry my pc on a trip.. so I've found it easier to download the pdf camera manual, then caring the manual hard copy with me. Manuals can be found on the camera manufactures web site.

Pen Tool Tutorials
For those interested in using the pen tool, this is a good site for it. Although, you could probably find any and all results and uses of the pen tool if you Google it. Yet, these are some tutorials that I pulled some of my presentation from.
http://psd.tutsplus.com/tutorials/tools-tips/photoshops-pen-tool-the-comprehensive-guide/
http://graphicssoft.about.com/od/photoshop/l/blrbps_4abfly.htm
Happy collaging!
http://psd.tutsplus.com/tutorials/tools-tips/photoshops-pen-tool-the-comprehensive-guide/
http://graphicssoft.about.com/od/photoshop/l/blrbps_4abfly.htm
Happy collaging!
Tuesday, March 15, 2011
Smoke Through ( virtual women – Surreal manipulation )

http://thundafunda.com/desgins/15-surreal-photo-manipulation-gallery/
Check-out some surreal photos for the idea of next assignment
Thursday, March 10, 2011
Loading Actions, Brushes, etc. and Transfering from Earlier Version
How to Move Photoshop Actions & More to Photoshop CS5
If possible, start preparing before the program arrives via mail or prior to downloading.
- Make a list of all products that you currently use that did not come with Photoshop(for example Photoshop, actions, scripts, filters, plug-ins, brushes, patterns, styles, etc.)
- Then make a second list of the items you actually want to bring with you. On this one write down the products you want to see again. Just because you downloaded and installed something in an older version, does not mean you actually use them. Think of this as spring cleaning. You do not want to load your new Photoshopwith non-essential stuff.
- After creating the list, you may want to check with the designers and companies to see that their products are compatible with Photoshop CS5. If you use an older version, it likely will work too. The Tell a Storyboards did have to be redone when CS4 launched. So if you purchased them prior to the release of CS4, and never upgraded to it, contact me with your receipt for the CS4+ version (which also works in CS5). While certain actions could have issues, hence why you want to contact the designer, most will probably work.
- Once you have this list, you need to locate each
- item (where it lives outside of Photoshop). For Photoshop actions, as an example, you may have them saved on your desktop or in a folder already.
- On your desktop, so it is easy to locate, create a master folder that says “Photoshop Products” and then have sub folders inside for each type of product you have downloaded in the past.
- Unfortunately scripts and plug-ins have more that can conflict with upgrades. So for example, if you own, Imagenomic Portraiture or Noiseware, you may want to contact them directly and ask if your current version will work and the best way to Install. Filters do not load in, they actually have installers.
- For Scripts, you will need to manually need to move them from the folder in your older version of PS into the Photoshop CS5 folders. Just find your original instructions from the script maker or contact them, to learn how to move these over. Again, check compatibility first.
- For products like tool presets, actions and brushes, the process is easy. And the directions below apply.
- Go to the folder you created on your desktop labeled "Photoshop actions", and move over all the actions you want to keep. For those you cannot locate, or that you created and never saved, go into Photoshop and save them from the actions palette into this new folder you created.

Now what? So you have brushes, actions, tools, and more all saved into folders. Once Photoshop CS5 arrives, first install the program. Organize your workspace, and then start loading in the fun stuff. To do this, go to the drop down menu, navigate your way to where you saved everything, click on a specific action set, and then it will load. Do this for each product.

Here is a few sites with FREE downloadable actions and brushes etc.
Tripwiremagazine.com
naldgraphics.net
phototutsplus.com
Wednesday, March 9, 2011

Tuesday, March 8, 2011
How To Create Duotone Images

Here's my MASSIVE write-up/instructions on how to create a Duotone image. It's really quite easy to do.
Duotone is a generic name applied to Monotone, Duotone, Tritone, & Quadtone photos. What all of these do is allow you to choose the specific colors that you want to comprise your image. The names are indicative of how many colors are used; Monotone uses one color, Duotone uses two colors, Tritone uses three colors, & Quadtone uses four colors.
True Duotones will utilize a printing press with only the selected spot colors to create the image. Meaning, if you select Pantone 311C (an aqua color) & Pantone Black 6C, your image will use only those two premixed inks, not the typical four inks in CMYK. This could potentially save you on printing costs, if offset printing.
To start off, you want to open the image you will be working with in Photoshop. Make sure the image is flattened completely. Now, go up to Image, Mode, & select Grayscale. A prompt will come up & you will click on discard. Go back up to Image, Mode, & you will see that Duotone is now an available option. Select that. An option box appears. First thing you want to do is make sure that the Preview box is checked underneath the Cancel button on the right. Next, you will see a dropdown to the left of the word Type. Here, is where you select how many colors you want as a Monotone, Duotone, Tritone, or Quadtone. If you toggle through each one, you will see the number of inks increase below. The default color for the first ink should be Black and the subsequent inks are left blank. For this example, I will select Duotone from the dropdown.
If you’d like you can go up to the Preset dropdown and scroll through the various combinations that Photoshop has available. This can be a good starting point when experimenting with colors. I will select “cyan bl 1” for now.
You will now see the Ink 2 fill box filled with Cyan, while Ink 1 stayed the same. To the left you will notice. Much, if not all of Photoshop’s presets utilize Black as Ink 1, but you can of course change that. To change the ink color without presets, simply click on the ink color box you want to change. You can then select a different color using the Color Picker or the Color Library.
Next to each color box, you will see a curve. These curves are very similar to the curves that you typically use in your full color images, but are directly related to each color of ink. You can change the contrast and brightness or darkness of the selected ink here. You can do so by clicking & creating new points along the curve, dragging existing points, &/or typing a numeric value into the fields to the right.
Once you are satisfied with how the image looks, click OK. If you need to go back in edit the Duotone curves or colors, simply go to Image, Mode, & click on Duotone again. Change the ink colors & curves like before.
Once you are done editing & would like to keep the Duotone as a True Duotone (or edit it later), you will want to go to File, Save As, & select the appropriate format. Saving the file as a PSD is likely the safest option.
If you just want the tonal effect of a Duotone, & will be printing on a standard printer, you can change the Mode back to RGB or CMYK & save the file as a JPEG, TIFF, or any other option. **But note, that you can no longer edit the Duotone as you did before. You will need to first convert it to Grayscale again, then Duotone, & reselect all of your settings.**

Monday, March 7, 2011
Thursday, March 3, 2011
photo magazines
I found a great source of various photo magazines.... the used outlet store at the Boise library. They are only 50cents!!
Tuesday, March 1, 2011
Photographer to check out - Ciro Totku

Some work that I saw in critique today reminded me a bit of the photographer Ciro Totku's work. A good portion of his work involves close-ups of objects, revealing abstract forms & interactions. He focuses on light/shadow & color planes as well. I find myself drawn to photographs along these lines & create somewhat similar works myself.
His site HERE
To see what other artist do with photos...http://www.artistaday.com


photos by Slinkachu


photos by Erik Johansson
Monday, February 28, 2011
Bent Objects
This site has some pretty cool stuff. I recommend checking it out:
http://bentobjects.blogspot.com/
http://bentobjects.blogspot.com/
Sunday, February 27, 2011
Photo Shop Tips & Tricks.. by Russell Brown
I picked up a cd that Russell Brown from PS put together of tips & tricks.. I'm happy to loan it out to my student friends... I'll put together a sign-out sheet for it & how about a week at a time? Just see me to borrow it...:) Jim
Friday, February 25, 2011
CS5 Tutorials
I found a very good website for the tutorial, teaching step-by-step, very useful!
http://www.noupe.com/tutorial/brilliant-adobe-photoshop-cs5-tutorials-from-2010.html
Create a Cosmic Love Goddess With Photoshop CS5
In this tutorial author demonstrates how to create a cosmic love goddess using some of Photoshop CS5′s new tools including the Refine Edge Feature which really helps to streamline the process of masking and removing objects from the background.
In this tutorial author demonstrates how to create a cosmic love goddess using some of Photoshop CS5′s new tools including the Refine Edge Feature which really helps to streamline the process of masking and removing objects from the background.
Thursday, February 24, 2011
Adobe Marketplace
Looking for brushes, filters, styles? There is plenty out there but it is often scattered and requires some digging. I have been a growing fan of all the content available on adobe.com's exchange site (http://www.adobe.com/cfusion/exchange/). It is hub for all sorts of user created content and program extensions for Photoshop as well as other CS programs like Dreamweaver, InDesign, and Illustrator. Most of it is free, and it has the benefits of all being searchable in one place. I have also found it is of a bit higher quality since it is moderated by Adobe.
http://www.adobe.com/cfusion/exchange/ is the base page, from there you can select your product, then search by the category your interested in.
Irina Werning: Back to the Future
"I love old photos. I admit being a nosey photographer. As soon as I step into someone else’s house, I start sniffing for them. Most of us are fascinated by their retro look but to me, it’s imagining how people would feel and look like if they were to reenact them today... A few months ago, I decided to actually do this. So, with my camera, I started inviting people to go back to their future."
This photographer took old childhood photographs of different people and photographed the person (now grown-up, obviously) in an effort to recreate the old photo. I love all the attention to detail. Talk about "making" a picture.
http://irinawerning.com/back-to-the-fut/back-to-the-future/
This photographer took old childhood photographs of different people and photographed the person (now grown-up, obviously) in an effort to recreate the old photo. I love all the attention to detail. Talk about "making" a picture.
http://irinawerning.com/back-to-the-fut/back-to-the-future/
Place to Sell your Photographs
Zatista.com .... curates work from emerging photographers in more than 20 countries. Prices start below $250.
Tuesday, February 22, 2011
Rocky Mountain Fireworks
FYI- Just wanted to let everyone know that if you are interested in visiting Rocky Mtn Fireworks off of Hwy 20\26 in Caldwell, be advised that they only sell fireworks at "wholesale" during the firework off-season. This means that you have to make a minimum purchase of $25.o0. Smoke booms range from $2.00-$6.00.
Happy Shooting.
Happy Shooting.
Technical Demos
March 8
Stephanie
Vikki
Leah
Angela
Charity
Sam
Lauren
Katie
March 10
Rodney
James
Michelle
Katherine
John
Nathan
Courtnay
Jade
Sunday, February 20, 2011
The Photograph That Made the Surreal Real "Dalí Atomicus"
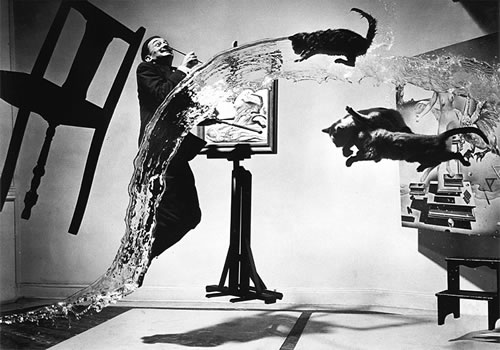
Philippe Halsman, 1948
Philippe Halsman / Estate of Philippe Halsman
Philippe Halsman is quite possibly the only photographer to have made a career out of taking portraits of people jumping. But he claimed the act of leaping revealed his subjects’ true selves, and looking at his most famous jump, "Dalí Atomicus," it’s pretty hard to disagree.
The photograph is Halsman’s homage both to the new atomic age (prompted by physicist’ then-recent announcement that all matter hangs in a constant state of suspension) and to Dalí’s surrealist masterpiece "Leda Atomica" (seen on the right, behind the cats, and unfinished at the time). It took six hours, 28 jumps, and a roomful of assistants throwing angry cats and buckets of water into the air to get the perfect exposure.
Saturday, February 12, 2011
Fabian Marti - HUNDHUND

Fabian Marti - HUNDHUND, 2006 Inkjet Print 181.7 X 110 CM}
More on Fabian Marti here ---> http://fabian.marti.name/
Thursday, February 10, 2011
Super cheap product photography setup
This came up on my stumbleupon a few days ago and I thought it was pretty cool (I just wish I saw it a few weeks ago. It would've been perfect for my "Evidence" assignment). I doubt many of us are doing much product photography, but I bet it could be applied in many other ways. Anything that helps us broke art students McGyver a $12 setup is alright by me.
http://www.handmadeology.com/studio-quality-product-photography-with-a-12-set-up/
http://www.handmadeology.com/studio-quality-product-photography-with-a-12-set-up/
Edward Burtynsky
Edward Burtynsky is an international photographer who documents wide-angle patterns, landscapes, and modern technologies and advancements that affect the world as well as our lives. The following is his website that contains information and photographs from across the world. In light of our new project, this may help a bit in terms of situations and locations (such as factories) that can make for some interesting images.
http://www.edwardburtynsky.com/
http://www.edwardburtynsky.com/
Monday, February 7, 2011
Dogtooth
So much of what I love about photography and art was in this film. Because I get a lot of inspiration from cinema, I thought a few of you might also be interested.
Disclaimer: If you are opposed to objectionable content it may not be your cup of tea.
http://www.youtube.com/watch?v=QFtDzK64-pk
Disclaimer: If you are opposed to objectionable content it may not be your cup of tea.
http://www.youtube.com/watch?v=QFtDzK64-pk
Thursday, February 3, 2011
Elizabeth Gilbert on nurturing creativity (ted.com)
For those who aren't familiar with ted.com videos, there is always a time to start. The video below is by the author Elizabeth Gilbert (Eat, Pray, Love), as she talks about inner genius and creativity from a perspective not often mentioned. The 20 minutes of the video will be gone before you know it as she captures your attention and fails to release it. I hope that you will take the time to give this video a chance. It truly is a remarkable inspiration for those who feel the pressure of creating. Enjoy!
http://www.ted.com/talks/elizabeth_gilbert_on_genius.html
http://www.ted.com/talks/elizabeth_gilbert_on_genius.html
Tuesday, February 1, 2011
Macro Photography
Macro photography is the idea of getting as close as possible as you can to an object or thing to reveal details. The following site contains some remarkable photos utilizing macro concepts to show amazing detail. Note: If you aren't a fan of insects, you may not want to look, but I recommend at least trying. What you can discover when you truly are able to look at the most fragile aspects of things can be vaguely addicting.
http://www.thephotoargus.com/inspiration/50-mind-blowing-examples-of-macro-photography/
http://www.thephotoargus.com/inspiration/50-mind-blowing-examples-of-macro-photography/
Wednesday, January 26, 2011
French Photographer Robert Doisneau

Robert Doisneau is one the most famous French photographers. Doisneau lived in France from 1912 to 1994, where he specialized in people photography, taking shots of common people as he wanders through the streets of Paris and its suburbs. He does an excellent job capturing the essence of the person he is photographing.
His life: Robert Doisneau was born on April 14, 1912 in Gentilly, in the suburbs of Paris. Having a not-so-good experience at school, he entered a craft school at the age of 13. This is where he had his first contacts with arts. The school gave a very limited art training, which he complemented with evening classes in life-drawing and still-life. Doisneau's interest in photography started in 1929 and he started as a professional in 1934. He worked for Renault until he was fired in 1939.
In 1939, he decided to become an independant photojournalist, but was called by the French army, where he served until 1940. He then worked for the "Resistance" until the end of the war. In parallel, he produced postcards to earn a little money. In 1949, Doisneau signed a contract with Vogue, for him he worked until 1952. As of 1952, he started working as a freelance photographer. Doisneau died in April, 1994 in Paris.
His art: Robert Doisneau's photographs were ones of common people, in common situations. He liked to wander in the streets of Paris suburbs, and to take his photographs as he went. His most famous photograph, Kiss by the Hotel de Ville, is a good representation of his style. Doisneau liked to practice photography with intuition, rather than with science.Doisneau also enjoyed to play with the light. He used almost exclusively natural lighting when at all possible until his later years when he began to photograph still life objects.
Subscribe to:
Posts (Atom)